९ 𝕊𝕖𝕥𝕣𝕚𝕩𝕚'𝕤 𝔾𝕦𝕚𝕕𝕖𝕤
❈ ・ 𝚒 𝚗 𝚏 𝚘 𝚛 𝚖 𝚊 𝚝 𝚒 𝚘 𝚗 . —
Hi. I'm Trixi. Sometimes I make things.┃@Setrixi#8454
My Commissions┃neverminding
❈ ・ 𝚋 𝚕 𝚎 𝚗 𝚍 𝚎 𝚛 ・ 𝚐 𝚞 𝚒 𝚍 𝚎 𝚜 . —
❈ 𝚋 𝚕 𝚎 𝚗 𝚍 𝚎 𝚛 ・ 𝚋 𝚊 𝚜 𝚒 𝚌 𝚜 . —
Viewport Movement:
‣ Rotate Camera - Middle Mouse Button
‣ Move Camera - Shift+Middle Mouse Button
‣ Zoom In/Out - Scroll WheelModes:
‣ Alternate Modes - Tab
‣ X-Ray Mode - Alt+ZSelection:
‣ Select All - A
‣ Cycle Select Modes - W
‣ Expand Selection - Ctrl+Add
‣ Circle Select - C
‣ Deselect while in Circle Select - Middle Mouse Button
‣ Select Linked - L
‣ Select Connected Vertices - Ctrl+L
‣ Select Additional Vertices/Faces/Edges - Shift+Alt+Left Click
‣ Separate - P
‣ Hide - H
‣ Unhide - Alt+H
‣ Delete - X
‣ Duplicate - Shift+DTools:
‣ Rotate - R
‣ Scale - S
‣ Move - G
‣ Extrude - E
‣ New Edge/Face from Vertices - F
‣ Loop Cuts - Ctrl+R
‣ Proportional Editing - O
‣ Vertex Only Bevel - Ctrl+Shift+BSearch Commands:
↳ Bring up your Search Bar with the command below,
type in the applicable tool that is highlighted in quotations.
‣ Search Bar - F3
‣ Sphere - "To Sphere"
‣ Bridge Edges - "Bridge Edge Loops"
‣ Fill - "To Fill"Weight Paint Commands:
‣ Change Brush Size - F
‣ Change Brush Strength - Shift+F (0.2 works well)
‣ Change Weight - Ctrl+FModifiers:
‣ Link Armature (Skeleton) - Armature Modifier
‣ Mirror Edit - Mirror Modifier
‣ Bulk Editing - Lattice Modifier
—————————— ❈ 𝚝 𝚒 𝚙 𝚜 & 𝚝 𝚛 𝚒 𝚌 𝚔 𝚜 .
❈ 𝚑𝚘𝚠 𝚝𝚘 - 𝚙𝚛𝚘𝚙𝚘𝚛𝚝𝚒𝚘𝚗𝚊𝚕 𝚎𝚍𝚒𝚝𝚒𝚗𝚐 .→ What is it? ←
The Proportional Editing Tool (O) is a way of transforming selected elements (such as vertices) while having that transformation affect other nearby elements. For example, having the movement of a single vertex causes the movement of unselected vertices within a given range. Unselected vertices that are closer to the selected vertex will move more than those farther from it (i.e. they will move proportionally relative to the location of the selected element). Since proportional editing affects the nearby geometry, it is very useful when you need to smoothly deform the surface of a dense mesh.→ How do I use it? ←
With Proportional Editing on, upon selecting a single vertex (or more), you can then choose the action you wish to take - Rotating, Scaling, Moving, etc. From there, zooming in with your Middle Mouse Button should eventually bring into view a once very large Circle. This is what dictates the range - from the size of a tiny ant and covering only one vertex - to scrolling all the way out to the size of a bus and controlling your entire mesh! Very customizable in this way.→ What is it good for?←
Proportional Editing is useful in almost absolutely everything you would look to be doing. From Hair & Outfit Mash-Ups, to Hair and Outfit Porting, all the way to allowing custom tweaks in a proportional manner for changing shapes & sizes.———————————————————————————❈ 𝚑𝚘𝚠 𝚝𝚘 - 𝚕𝚊𝚝𝚝𝚒𝚌𝚎 𝚖𝚘𝚍𝚒𝚏𝚒𝚎𝚛 .→ What is it? ←
The Lattice modifier deforms the base object according to the shape of a Lattice object. Objects to be deformed can be meshes, curves, surfaces, text, lattices and even particles.→ How do I use it? ←
In Object Mode - from the Menu located at the top of your View Port - select Add and Navigate to Lattice. Your Lattice will default to the "floor" of your View Port (i.e. at the Red Line). To fix this, you will want to use your familiar important Commands - R, S, G - to Rotate, Scale, and Move the Lattice modifier appropriately into place over your objects.→ How do I add more Edges and Vertices to the Lattice? ←
Select the Lattice in your Outliner (located by default in the upper right-hand corner). It should highlight in Orange. Under your Properties panel (located just below the Outliner by default), find and select Object Data Properties. Change the Resolution UVW to add more customizability for tweaking.→ How do I assign my objects to the Lattice? ←
The manual way to do this is to select each object in your Outliner, navigate to their Modifier Properties, then select Add Modifier > Lattice Modifier. Be sure to hook the two together by choosing the Lattice you want to connect under Object: section on the modifier window.→ What is it good for? ←
Personally, I use it often to extend the length of meshes. However, it can also be used to help control multiple objects at the same time in a more uniform fashion. Very similar to the Proportional Editing Tool, but it has its clear uses where one outdoes the other.———————————————————————————❈ 𝚑𝚘𝚠 𝚝𝚘 - 𝚝𝚛𝚊𝚗𝚜𝚏𝚎𝚛 𝚠𝚎𝚒𝚐𝚑𝚝𝚜 .→ What's are weights? ←
Weight Painting itself is how you allow a part of an object to follow a designated bone. This is what allows an item to have physics and move with your character, rather than float awkwardly or remain completely stiff. Transferring weights is an alternative to beginners as it is easily accessible, but not perfect. Be sure that when you are transferring weights that you are using similar objects. (Example: A hair with bangs and pigtails, unweighted, needs a hair with bangs and pigtails to steal weights from more reliably.)Video Guide: How To Weight Transfer in Blender↳ [Personal Preference] Method 1:
01.) Select your source mesh (the thing with the weights)
02.) Hold Ctrl and select your target mesh (the thing that needs the weights)
03.) Go into Weight Paint Mode
04.) Go to the Weights menu, then Transfer Weights
05.) Press T to open your Tool Shelf if it hasn’t opened already and expand the Transfer Mesh Data window
06.) Set Data Type to Vertex Groups.
07.) Set Vertex Mapping to Nearest Edge Interpolated.
08.) Set Source Layer to By Name.
09.) Set Destination Layers Matching to All Layers.
10.) Set Mix Mode to Replace.
11.) Check both Create Data and Object Transform.
12.) Leave everything else as is.
13.) Give the target mesh, which should now have weights, an Armature Modifier, so it knows which rig to follow.
14.) Lock your translations (scale/location/rotation) by selecting your mesh in Object mode, pressing Ctrl+A and applying the transformations.↳ [Alternate Version] Method 2:
01.) Select your target mesh (the thing that needs the weights).
02.) Add a Data Transfer Modifier.
03.) Add your source mesh (the thing with the weights) as the Source Object.
04.) Set Vertex Data to Nearest Edge Interpolated.
05.) Set Mix Mode to Replace
06.) Leave everything else as is.
07.) Hit Apply in Object Mode.
08.) Give the target mesh, which should now have weights, an Armature Modifier, so it knows which rig to follow.
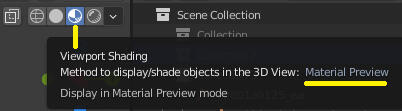
09.) Lock your transformations (scale/location/rotation) by selecting your mesh in Object mode, pressing Ctrl+A, and applying the transformations.———————————————————————————❈ 𝚑𝚘𝚠 𝚝𝚘 - 𝚜𝚎𝚝 𝚞𝚙 𝚢𝚘𝚞𝚛 𝚟𝚒𝚎𝚠𝚙𝚘𝚛𝚝 .If you are seeing a Silver Mesh on model import, change the View Port Shading in the upper right hand corner to Material Preview:
By default, your Mesh is now a glitchy mess. To fix this, select a Part in each group & change the Blend Mode to Alpha Clip.
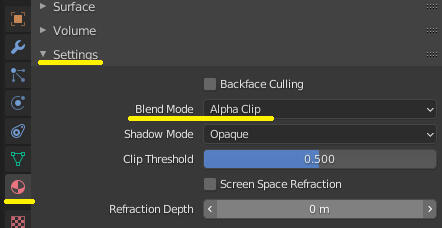
You must select a singular part PER group in your Outliner. Changing one Part should reflect upon the rest in that group.
❈ ・ 𝚝 𝚛 𝚘 𝚞 𝚋 𝚕 𝚎 𝚜 𝚑 𝚘 𝚘 𝚝 𝚒 𝚗 𝚐 . —
❈ 𝚑𝚘𝚠 𝚝𝚘 - 𝚏𝚒𝚡 𝚘𝚋𝚓𝚎𝚌𝚝𝚜 𝚏𝚕𝚘𝚊𝚝𝚒𝚗𝚐 𝚒𝚗 𝚝𝚑𝚎 𝚜𝚔𝚢 .More than likely, this has just happened after doing a Weight Transfer & linking Armature from your Source Mesh to the Destination Mesh that needed weights. This issue arises when the Mesh that needed weights lacked the specific armature to properly scale.→ Troubleshooting: ←
01.) In Blender - Select All the Parts in your Outliner which received the Weight Transfer.
02.) Drag them over to the new Armature (n_root) they were rigged to.
03.) Hovering over the correct n_root, you should see:
Shift to Parent, Alt to Keep Transforms.
04.) Holding both Shift+Alt, drop your Parts to Parent them to the new Armature, while keeping the applied transforms.
05.) Export .FBX and test!———————————————————————————❈ 𝚑𝚘𝚠 𝚝𝚘 - 𝚝𝚛𝚒𝚊𝚗𝚐𝚞𝚕𝚊𝚝𝚎 𝚊 𝚖𝚎𝚜𝚑 .> [WARN] Critical Error: FBX is not fully triangulated. Please export from your 3D modeling program with Triangulate option enabled.If you are seeing this error on Import in TexTools, this means that your mesh is not fully consisting of Triangles - whether that means a singular edge is missing or a ton! Luckily, this fix can be super simple.→ Triangulate Method ←
01.) In Blender - navigating to your Outliner, select the first part of your mesh and Tab into Edit Mode.
02.) Hit A to Select All.
03.) Use the shortcut Ctrl+T to Triangulate this specific Part's mesh. [Make sure your Mouse Cursor is outside of the Outliner for each Ctrl+T!]
04.) Repeat steps 01-03 for each individual part.
05.) Export as .FBX and try Importing it into TexTools once again!———————————————————————————❈ 𝚑𝚘𝚠 𝚝𝚘 - 𝚌𝚘𝚛𝚛𝚎𝚌𝚝 𝚒𝚗𝚟𝚒𝚜𝚒𝚋𝚒𝚕𝚒𝚝𝚢 𝚏𝚛𝚘𝚖 𝚊𝚗𝚐𝚕𝚎𝚜 .This is most likely a Backface issue and has a few Trial and Error troubleshooting techniques to attempt. The reason I say "troubleshooting" is because this is something I'm still trying to learn and pin-point the exact issue of, reliably. For now: Process of elimination it is!→ Troubleshooting ←
↳ Method One:
01.) In TexTools - Navigate to your Model's Material, under the Textures Tab. Select the problematic Material in the Material drop-down menu (Ex: HIR A).
02.) Select More Options > Edit Material.
03.) Depending on the current Material's settings, either toggle to Hide or Show Backfaces, hit Save and Test. ↳ Method Two:
01.) In Blender - Select All of the affected hair in Edit Mode.
02.) Duplicate it (Shift+D).
03.) Right Click > Separate > Selection.
04.) Tab back into Object Mode.
05.) In your Outliner, select the newly Separate Part.
06.) Tab into Edit Mode.
07.) Select All (A), Navigate to the View Port menu at the top.
08.) Under Mesh, find Normals > Flip.
09.) Export .FBX - rename it to test - and Import into TexTools.↳ Method Three: (Hair only.)
01.) Try deselecting Clone UV1 to UV2 on your Import.→ Note ←
None of these or a combination of these could work. Single a Method out, or pair them with each other. No guarantees - but as I said, it is Trial and Error. I will edit this as I learn more specifics.———————————————————————————❈ 𝚑𝚘𝚠 𝚝𝚘 - 𝚌𝚕𝚎𝚊𝚛 𝚜𝚑𝚊𝚛𝚙 𝚏𝚛𝚘𝚖 𝚏𝚕𝚒𝚙𝚙𝚎𝚍 𝚗𝚘𝚛𝚖𝚊𝚕𝚜 .1.) Disable Auto Smooth.
2.) Select all vertices (Ctrl+A).
3.) Mesh > Clean up > Merge by Distance.
4.) Mesh > Normals > Recalculate Outside.
5.) RMB > Shade Smooth.———————————————————————————❈ 𝚑𝚘𝚠 𝚝𝚘 - 𝚝𝚛𝚘𝚞𝚋𝚕𝚎𝚜𝚑𝚘𝚘𝚝 𝙳𝚇𝟷𝟷 𝚎𝚛𝚛𝚘𝚛𝚜 .Firstly, I cannot suggest enough seeking help through the FFXIV TexTools & Modding Discord for more extensive issues. That being said, there are some known issues one can run into while modding and working with Textures.→ Troubleshooting ←
↳ Method One:
In TexTools - Always be sure to pay attention to the Texture Information in the upper left-hand corner of the Material View in the Texture Tab. This means that not only do save types have to match (ex. 8.8.8.8 ARGB), but the MipMaps do as well. If either of these do not match, the Texture either won't import, or your game will crash upon entering. [Proper number of MipMaps can be assigned using a .DDS plug-in.] ↳ Method Two:
This might be well known, however, Textures for Games tend to be sized to the Power of Two. Disobeying this by importing a texture that does not follow this rule may result in your game crashing. ↳ Method Three:
While Textures are sized to the Power of Two, there is such a thing as too large. As such, I would recommend not exceeding 2048x2048 for any texture, but especially not multiple textures. This will be too much to handle and could potentially result in a crash.———————————————————————————
❈ ・ 𝚑 𝚘 𝚠 - 𝚝 𝚘 ・ 𝚐 𝚞 𝚒 𝚍 𝚎 𝚜 . —
❈ 𝚑𝚘𝚠 𝚝𝚘 - 𝚗𝚊𝚖𝚒𝚗𝚐 & 𝚐𝚛𝚘𝚞𝚙𝚒𝚗𝚐 𝚘𝚞𝚛 𝚙𝚊𝚛𝚝𝚜 .→ What's the point? ←
When combining two or more objects in Blender, each object that uses a separate material must have its own Group/Part. This is what tells TexTools how to separate objects into different groups, allowing them the ability to be assigned separate materials on Import.→ Example: ←
If you are doing a Mash-Up of 3 Hairstyles, each of these Hairstyles will require a different material. Thus, each must be assigned to it's own Group Number. To do this, it is as simple as renaming their Part # in the Outliner. HOWEVER: Note that TexTools REQUIRES a Part 0.0 - do not neglect the 0.0!↳ Hairstyle 01 and all 4 of its Parts use the same material, as such they will be named: Part 0.0, Part 0.1, Part 0.2, Part 0.3, etc.↳ Hairstyle 05 and all 26 of its Parts use the same material, as such they will be named: Part 1.0, Part 1.1 .... Part 1.24, Part 1.25, Part 1.26, etc.↳ Hairstyle 10 and all 14 of its Parts use the same material, as such they will be named: Part 2.0, Part 2.1, Part 2.2, etc.TexTools naming convention is: Part #.#, starting with Part 0.0!———————————————————————————❈ 𝚑𝚘𝚠 𝚝𝚘 - 𝚝𝚛𝚊𝚗𝚜𝚙𝚊𝚛𝚎𝚗𝚌𝚢 𝚘𝚗 𝚊 𝚜𝚝𝚊𝚗𝚍𝚊𝚛𝚍 𝚖𝚊𝚝𝚎𝚛𝚒𝚊𝚕 .01.) In Textools - Export the Normal .DDS of the item you wish to add transparency.
02.) In Photoshop - Open your Normal Texture.
03.) Navigate to the Channels Tab. Select the BLUE Channel.
04.) Begin to colour in the sections you want fully transparent with Black.
↳ Different shades when transitioning from white, to grey, to black are used to vary the amount of transparency. White being Opaque. Black being fully Transparent.
05.) Once desired transparency is reached - save file as .DDS and import it into TexTools.→ Note ←
This method can be used on Skin Materials as well, to hide attributes that may be unwanted, such as Miqo'te Ear Flaps.———————————————————————————❈ 𝚑𝚘𝚠 𝚝𝚘 - 𝚊𝚍𝚍 𝚑𝚒𝚐𝚑𝚕𝚒𝚐𝚑𝚝𝚜 𝚝𝚘 𝚊 𝚑𝚊𝚒𝚛 𝚖𝚊𝚝𝚎𝚛𝚒𝚊𝚕 .01.) In Textools - Export the Multi .DDS of the Hair Material you wish to add (or remove) highlights.
02.) In Photoshop - Open your Multi Texture.
03.) Navigate to the Channels Tab. Select the ALPHA Channel.
04.) Begin to colour in the sections you want fully highlighted with White.
↳ Different shades when transitioning from white, to grey, to black are used to vary the amount of variance between highlight and base hair colour. White being Full Strength for Highlights. Black being Full Strength for Base Hair Colour. You can completely change the way a Hair Material dyes in this way.
05.) Once desired highlight placement is reached - save file as .DDS and import it into TexTools.→ Note ←
It is often helpful to blend smoothly out your highlights with a mixture of Blur Tool, Smudge Tool, Surface Blur, or using different transitional Opacities, to give a more natural look. However, if you want more defined highlights, less blending is needed———————————————————————————❈ 𝚑𝚘𝚠 𝚝𝚘 - 𝚎𝚍𝚒𝚝 𝚍𝚒𝚏𝚏𝚞𝚜𝚎 𝚏𝚘𝚛 𝚋𝚕𝚊𝚌𝚔 𝚜𝚌𝚕𝚎𝚛𝚊 .01.) In TexTools - Export the .PNG or .DDS of the Face Diffuse for the Race you wish to edit.
02.) In Photoshop - Open your Texture and create a New Layer.
03.) Using the Paint Brush Tool in the colour Black, find the off-white Octagon on your Diffuse Texture. This should be the Sclera.
04.) Begin to colour in the portions of the eye with black, but do try to have some careful precision when doing so.
05.) Save as .PNG or .DDS, Import into TexTools.———————————————————————————❈ 𝚑𝚘𝚠 𝚝𝚘 - 𝚎𝚍𝚒𝚝 𝚎𝚢𝚎 𝚝𝚎𝚡𝚝𝚞𝚛𝚎/𝚜𝚙𝚎𝚌𝚞𝚕𝚊𝚛 .OUTDATED: The process is far more simple than this, but I will be leaving this tutorial for those who enjoy seeing trial and error and learning from it, as well.
01.) In TexTools - Export the .PNG of the Eye Specular [Multi] for the Race you want to change.
02.) In Photoshop - Open your Eye Texture and resize it to 512x512. Set it to the side.
03.) Open a New File [File > New], and set the file size to 512x512.
04.) Navigate back to your Eye Texture. Hide ALL channels except the GREEN channel.
05.) With the Green Channel selected, hit Ctrl+A to Select All. Then Ctrl+C to copy.
06.) On your New File, hit Ctrl+V to Paste the Green Channel's image.
07.) Navigate to Image Rotation and flip the image by 180° [Image > Image Rotation].
08.) Create a New Layer and set it to Soft Light.
09.) Begin to map out your custom Iris with the colour White.
10.) Create a New Layer, keeping it at Normal.
11.) Begin to map out your custom Pupil with the colour Black.
12.) Once complete, Flatten Image [Layer > Flatten Image].
13.) Navigate back to the Channels tab, and select the RED channel only.
14.) With the Red channel select, adjust its Levels [Image > Adjustments > Levels].
15.) Adjust the Output Levels of the BLACK slider until your image is more grey.
16.) Once complete, create a a Gradient Fill layer.
17.) Allow the Gradient to fade from Dark Grey into White from Top to Bottom
18.) Set the Gradient to Soft Light.
19.) Once again, Flatten Image.
20.) Navigate back to the Channels tab, deselect ALL channels except the RED channel.
21.) With the Red Channel selected, hit Ctrl+A to Select All. Then Ctrl+C to copy.
22.) On your Eye Texture, under the Channels tab, select the RED channel.
23.) Hit Ctrl+V to Paste your new Eye Texture into the Red Channel.
24.) Save as .PNG or .DDS, Import into TexTools. Test.→ Note ←
This is my very personal discovery on my lonesome in how to create custom eyes. It is not perfect. However, it does work. Experiment with Gradient Fill Layers. Different levels of grey. But most importantly, pay attention to the Red Channel of any eye you edit - this will put into perspective just how eyes work within FFXIV.———————————————————————————❈ 𝚑𝚘𝚠 𝚝𝚘 - 𝚍𝚢𝚎 𝚕𝚊𝚜𝚑𝚎𝚜 / 𝚋𝚛𝚘𝚠𝚜 .01.) Take the Alpha Channel from the Normal Texture.
02.) Use the Lasso Tool to wrap around both sets of lashes or brows, copy the selection on the Alpha.
03.) Take the Multi Texture, and "Paste in Place" your recently copied selection. This is your guide for location.
04.) Take a brush in one of the Cheat Sheet colours listed below, and colour over the lashes or brows within the selection - be sure you cover it all - on a new layer.
- (Be careful to not colour into other face attribute areas.) -
05.) Once complete, hide the guide layer you pasted from the Normal's Alpha channel.
06.) Save as .DDS and import into TexTools!
- Please note that variations of the colours listed below (and even mixing them) will possibly yield better results in what you're looking for. What is listed below is simply there to get you started, and is accurately labled. -CHEAT SHEET:
- #9800ff - Hair Colour Match
- #9600ff - Darker Colour Match
- #f800ff - Brightest Colour Match
- #1903ff - Dye Black.———————————————————————————❈ 𝚑𝚘𝚠 𝚝𝚘 - 𝚝𝚊𝚒𝚕 & 𝚎𝚊𝚛𝚜 𝚜𝚠𝚊𝚙 .I often get asked to do tail & ear swaps, so I wrote this guide a while back to help people through how to do the swaps between the same race. This does not account for swapping races or genders. Generally speaking, however, Au Ra Female and Miqo'te Female can use the same assets with not too much scaling. Otherwise, you will have to delve into learning the nifty tools: Move [G], Scale [S], and Rotate [R].Image is in .PNG format since it is rather lengthy.

❈ ・ 𝚟 𝚒 𝚍 𝚎 𝚘 ・ 𝚐 𝚞 𝚒 𝚍 𝚎 𝚜 . —
———————— ❈ 𝚖 𝚢・𝚟 𝚒 𝚍 𝚎 𝚘・𝚐 𝚞 𝚒 𝚍 𝚎 𝚜 .
———————— ❈ 𝚢 𝚘 𝚞 𝚝 𝚞 𝚋 𝚎 ・ 𝚐 𝚞 𝚒 𝚍 𝚎 𝚜 .
❈ ・ 𝚝 𝚘 𝚘 𝚕 𝚜 & 𝚌 𝚛 𝚎 𝚍 𝚒 𝚝 𝚜 . —
‣ Blender - 3D Work
‣ Adobe Photoshop CC 2019 - Image Editing.
‣ Intel Texture Works Plugin for Photoshop - .DDS AddOn
‣ Normal Map Online - Normal Map Generator.
‣ waifu2x - Upscales.
‣ TexTools by Liinko.
‣ TexTools Reference Document by Sel
‣ Vanilla Textures/Meshes by Square Enix.
‣ Make-up Bases by Rose.
‣ Texture Upscales by Minou & Miette.
‣ Illyriana & Bizu for their open sources of help.
‣ Koneko for their helpful guide compilation discord.
‣ BnS and Tera Online for certain Ears/Tail meshes.
‣ DA users: UnluckyCandyFox, yron1, Shiremide1, sticklove─────────── Discord┃@Setrixi#8454 ───────────
❈ ・ 𝚖 𝚘 𝚍 𝚜・𝚒 𝚗・𝚞 𝚜 𝚎 . —
While I use mostly my own mods when experimenting - I do very much enjoy the work of others and their endless creativity.
This section includes the authors of mods I currently use the most, by type! This, of course, changes over time.‣ Body Mod - "Bibo+" by Illyriana, Tsar, Bizu.
‣ Body Mod cont. - "Lithe" by Lye.
‣ Private OC's Lashes - Zero.
‣ Feminine Body Tattoos - Crystia, Lace & Vine.
‣ Feminine Miqo'te Make-Up - Crono, Zero.
‣ Clothing Mods - Ivery, C&O, Lace & Vine, Illyriana, Lye.
‣ Hair Mods - Ruta, Curse&Omen, Zero.
‣ Eye Textures - Gwynne, Crystia, Toru.
‣ Eye Catchlight & Normal - ElegyWorks.
‣ Poses (Talls) - Lilith, Leah, Freja, Tsuki Blacc, R.B.B.
‣ Poses (Smalls) - Strawberry, Pinki.